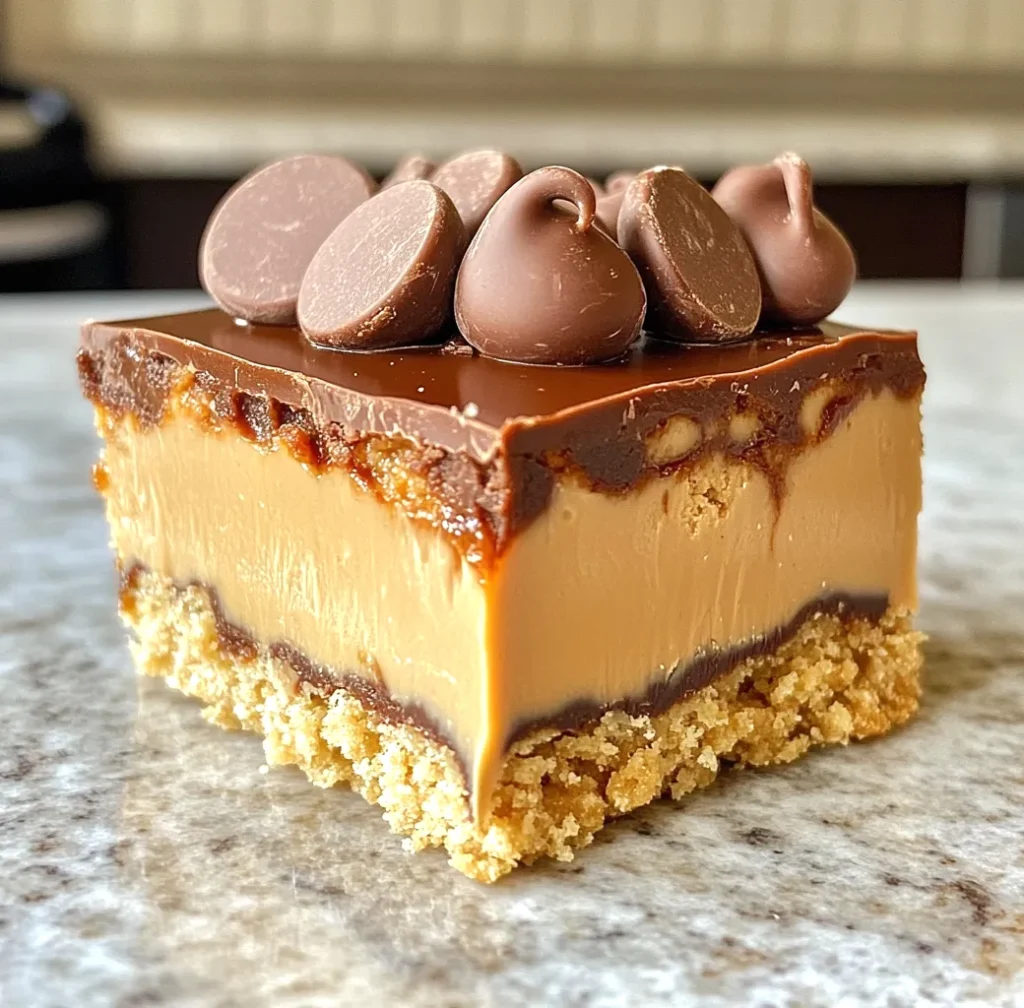
If you’re a fan of the irresistible combination of chocolate and peanut butter, then these Reese’s Peanut Butter No-Bake Bars are about to become your new favorite treat! This easy recipe brings together the iconic flavors of Reese’s Peanut Butter Cups in a homemade, no-bake format, perfect for satisfying your sweet tooth without turning on the oven. With just a few simple ingredients and minimal prep time, these bars are a dream come true for peanut butter lovers.
Not only are they delicious, but they also make for a perfect dessert to bring to parties, holiday gatherings, or to keep on hand for those days when you just need a little indulgence. Let’s dive into everything you need to know to make these mouthwatering bars.
Why You’ll Love Reese’s Peanut Butter No-Bake Bars
These Reese’s Peanut Butter No-Bake Bars check all the boxes when it comes to a quick and delicious dessert. Here’s why you’ll love them:
- No baking required: Skip the hassle of preheating the oven. This recipe comes together quickly and easily with just a mixing bowl and microwave.
- Rich and indulgent: With a buttery graham cracker base, creamy peanut butter, and a thick layer of chocolate, these bars are the ultimate treat for any chocolate and peanut butter lover.
- Perfect for sharing: Whether you’re making them for a family gathering, holiday party, or just as a gift, these bars are perfect for sharing. They’re easy to cut into bite-sized squares, making them the perfect party dessert.
- Quick to prepare: You only need about 15 minutes of active prep time, and then the fridge does the rest of the work! That means you can whip these up even on busy days when you need a sweet fix.
Ready to get started? Let’s break down the ingredients and step-by-step instructions for this delicious no-bake dessert.
Ingredients for Reese’s Peanut Butter No-Bake Bars
Here’s a quick look at the simple ingredients you’ll need to make these Reese’s Peanut Butter No-Bake Bars:
- 1 cup butter (melted): The butter provides richness and helps bind the graham cracker crumbs together to form the base of the bars.
- 2 cups graham cracker crumbs: These add structure and a slightly crunchy texture to the peanut butter layer, balancing out the creaminess.
- 1/4 cup brown sugar: Brown sugar adds sweetness and a slight molasses flavor, enhancing the overall richness.
- 1 3/4 cup powdered sugar: Powdered sugar ensures that the peanut butter layer is smooth and creamy.
- 1 cup peanut butter: Peanut butter is the star of this recipe, providing that rich, nutty flavor we all love. For best results, use creamy peanut butter for a smooth texture.
- 1/2 tsp vanilla extract: Vanilla enhances the flavor of the peanut butter and adds a subtle warmth to the bars.
- 1 (11 oz) bag of milk chocolate chips: Melted chocolate creates the decadent top layer that mimics the classic Reese’s peanut butter cup experience.
These ingredients come together to create a rich, creamy, and satisfying dessert that’s sure to become a hit with your family and friends.
Step-by-Step Instructions for Reese’s Peanut Butter No-Bake Bars
Now that we’ve gathered our ingredients, it’s time to put it all together. Follow these simple steps to create your own batch of Reese’s Peanut Butter No-Bake Bars.
1. Combine the Ingredients for the Peanut Butter Base
In a medium-sized mixing bowl, combine the melted butter, graham cracker crumbs, brown sugar, powdered sugar, peanut butter, and vanilla extract. Stir the ingredients together until the mixture is smooth, creamy, and well combined. The peanut butter mixture should be thick enough to hold its shape but still spreadable.
This peanut butter layer serves as the base of your bars, with the graham cracker crumbs adding a slight crunch and the sugars adding the perfect amount of sweetness.
2. Press the Mixture into a Pan
Once your peanut butter mixture is ready, pour it into a 9 x 13-inch baking pan. Use a spatula or the back of a spoon to spread the mixture evenly across the pan, pressing it down firmly to create an even, compact layer. Make sure the surface is smooth and level for an even base.
This step is important because it ensures that the peanut butter layer is sturdy enough to hold the chocolate topping without falling apart.
3. Melt the Chocolate
Next, it’s time to prepare the chocolate topping. In a microwave-safe bowl, pour the milk chocolate chips and heat them in the microwave on 50% power for 1-2 minutes. Be sure to stop and stir the chocolate every 30 seconds to prevent it from burning. Continue heating and stirring until the chocolate is completely melted and smooth.
If you prefer, you can melt the chocolate using a double boiler on the stove, but the microwave method is faster and easier for this no-bake recipe.
4. Spread the Chocolate Over the Peanut Butter Layer
Once your chocolate is fully melted, pour it over the peanut butter mixture in the pan. Use a spatula to spread the chocolate evenly over the top, making sure to cover the entire surface. The thick layer of chocolate should form a smooth, glossy coating on top of the peanut butter base.
This chocolate layer is what transforms these bars into a decadent dessert that rivals any store-bought treat!
You may like : No-Bake Peanut Butter Cheesecake Balls
5. Refrigerate to Set
Now that your bars are assembled, it’s time to let them set. Place the pan in the fridge and let the bars chill for at least one hour. The chilling process allows the peanut butter layer to firm up and the chocolate to solidify, making it easier to cut the bars into neat squares.
Once the bars are fully set, you’ll be able to slice them cleanly without the layers mixing or falling apart.
6. Cut and Serve
After the bars have chilled and set in the fridge, it’s time to cut them into squares. Use a sharp knife to cut the bars into your desired size. You can cut them into larger squares for a more indulgent treat or smaller, bite-sized pieces if you’re serving them at a party or gathering.
Enjoy these rich and satisfying Reese’s Peanut Butter No-Bake Bars as an afternoon snack, a dessert after dinner, or a sweet treat to share with friends and family.
Tips for Making the Best Reese’s Peanut Butter No-Bake Bars
Here are a few tips to ensure your bars come out perfectly every time:
- Use room temperature ingredients: Make sure your butter and peanut butter are softened before mixing. This will ensure the ingredients blend together smoothly.
- Don’t overheat the chocolate: When melting the chocolate, be careful not to overheat it. Chocolate can easily burn, so it’s best to melt it slowly and stir frequently.
- Chill thoroughly: Allow the bars to chill for at least an hour before cutting them. This will ensure that the layers set properly and that the bars hold their shape.
- Customize the toppings: Feel free to sprinkle some crushed peanuts, sea salt, or even mini Reese’s Pieces over the melted chocolate layer for added texture and flavor.
Perfect for Any Occasion
Whether you’re craving a sweet treat to satisfy your peanut butter and chocolate obsession or looking for a simple yet impressive dessert to serve at a gathering, these Reese’s Peanut Butter No-Bake Bars are the perfect choice. With just a handful of ingredients and no baking required, you can whip up a batch in no time.
Serve these bars at your next holiday party, bring them to a potluck, or enjoy them as a cozy treat at home. However you choose to indulge, one thing is certain—these bars are sure to disappear quickly!
Ready to make your own? Head to our website for more easy no-bake dessert recipes, and don’t forget to share your creations with us on social media!
Variations and Customizations for Your Reese’s Peanut Butter No-Bake Bars
One of the best things about these Reese’s Peanut Butter No-Bake Bars is that the recipe is so versatile! You can easily tweak the ingredients to suit your preferences or experiment with fun new flavors. Here are a few variations you can try:
- Dark Chocolate Twist: If you prefer a more intense chocolate flavor, substitute the milk chocolate chips with dark chocolate chips. This adds a deeper, richer flavor to your bars and balances the sweetness of the peanut butter filling.
- Crunchy Peanut Butter: If you like a bit of texture in your treats, swap out the creamy peanut butter for crunchy peanut butter. The bits of peanut in the filling will add a delightful crunch to each bite.
- Peanut Butter Cups Topping: For an extra dose of Reese’s flavor, chop up mini Reese’s Peanut Butter Cups and sprinkle them over the melted chocolate before chilling the bars. It’s a fun, eye-catching topping that also enhances the classic chocolate-peanut butter combo.
- Nut-Free Version: If you or someone you know has a peanut allergy, you can make a nut-free version of these bars by using sunflower seed butter or cookie butter instead of peanut butter. Both alternatives work well and still give you that rich, creamy filling!
These customizations allow you to make the recipe your own and cater to various tastes or dietary needs. Whether you prefer your bars sweet, salty, crunchy, or smooth, you can easily create a version that’s perfect for you.
Perfect Dessert for Holidays, Parties, and Special Occasions
These Reese’s Peanut Butter No-Bake Bars are not only easy to make but also perfect for a wide range of occasions. Here’s why you’ll want to whip them up for your next event:
- Holiday Treats: With their rich chocolate and peanut butter flavors, these bars are a hit at holiday gatherings like Christmas, Thanksgiving, or Halloween. You can even dress them up by adding festive sprinkles or colored icing for an extra seasonal touch.
- Party Snacks: Whether it’s a birthday party, a baby shower, or a backyard BBQ, these bars are an excellent addition to any dessert table. They’re bite-sized, easy to eat, and sure to please a crowd of all ages.
- Gifts for Friends and Family: Homemade treats make the best gifts, and these no-bake bars are no exception. Package them up in a cute box or tin, and give them as a thoughtful, homemade gift to friends, family, or coworkers during the holiday season.
- Weekday Dessert: When you’re in the mood for a sweet treat but don’t want to spend too much time in the kitchen, these bars are a great option. They’re quick to make and can be stored in the fridge, so you can grab one whenever you’re craving something indulgent.
No matter the occasion, these Reese’s Peanut Butter No-Bake Bars are guaranteed to be a crowd-pleaser. Their rich flavor and easy preparation make them a favorite for both novice and experienced bakers alike.
Storing and Freezing Your Reese’s Peanut Butter No-Bake Bars
Once you’ve made a batch of these delicious bars, you might be wondering how best to store them, especially if you plan on making them ahead of time for a special event. Fortunately, these Reese’s Peanut Butter No-Bake Bars store beautifully, so you can enjoy them for days (if they last that long!).
Here’s how to store and freeze them:
- Storing in the Refrigerator: After making the bars, you’ll want to store them in an airtight container in the refrigerator. They can stay fresh in the fridge for up to one week. When you’re ready to serve, you can enjoy them straight from the fridge or let them sit at room temperature for a few minutes if you prefer a softer texture.
- Freezing for Later: If you’d like to make these bars ahead of time, they freeze wonderfully. Simply cut them into squares, place them in an airtight container or a freezer-safe ziplock bag, and freeze for up to three months. Be sure to separate layers with wax or parchment paper to prevent the bars from sticking together. When you’re ready to enjoy, just thaw them in the refrigerator overnight or at room temperature for about 30 minutes.
- Serving Tips: These bars are best served chilled or at room temperature. If you’re bringing them to a party, you can store them in the fridge until right before serving to keep the chocolate layer intact. The bars will hold up well at room temperature for a few hours, making them great for picnics or outdoor events.
Read more : Crockpot Garlic Butter Chicken & Steak with Parmesan Cream Sauce and Cheesy Roasted Potatoes

Reeses Peanut Butter No Bake Bars
Ingredients
- 1 cup butter melted
- 2 cups graham cracker crumbs
- 1/4 cup brown sugar
- 1 3/4 cup powdered sugar
- 1 cup peanut butter
- 1/2 tsp. vanilla
- 1 11 oz bag milk chocolate chips
Instructions
- Combine all ingredients, except the chocolate chips in a medium sized bowl. Stir until the mixture is smooth and creamy.
- Pour peanut butter mixture into a 9 x 13 pan.
- Melt chocolate chips in the microwave (at 50% power) for 1-2 minutes. Stir chocolate and pour over the peanut butter mixture. Spread chocolate over mixture with a spatula.
- Put bars in fridge for one hour to set. Cut while bars once cooled.
