If you’ve ever craved the mouthwatering goodness of a banana split but dreaded the hassle of baking, you’re in for a treat! This no-bake banana split cake is a dream come true for dessert lovers. Packed with layers of creamy filling, fresh bananas, crushed pineapple, and a crunchy graham cracker crust, it’s perfect for summer or anytime you want a quick, no-fuss dessert. Oh, and the best part? No need to turn on the oven!
This guide will walk you through everything, from the ingredients to pro tips for perfecting the dessert. Whether you’re whipping it up for a family gathering or just indulging yourself, this no-bake banana split cake will be a hit.
What is a No-Bake Banana Split Cake?
A Sweet Introduction to the Dessert
Imagine a dessert that combines all the best elements of a banana split sundae but transforms it into a luscious layered cake. That’s exactly what this banana split cake delivers. It’s a playful twist on a classic treat, offering the same creamy, fruity flavors in a convenient, oven-free recipe.
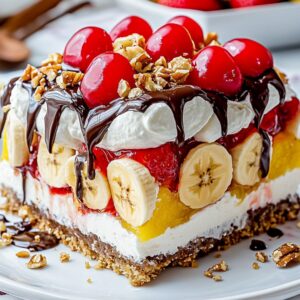
The cake’s appeal lies in its simplicity. From the buttery graham cracker crust to the whipped topping sprinkled with cherries and chocolate drizzle, every bite is a harmonious blend of textures and flavors. Plus, it’s a breeze to make — ideal for beginners and seasoned cooks alike.
Why Choose a No-Bake Dessert?
- Convenience: Skip the baking and cut prep time in half.
- Summer-Friendly: No hot ovens, just cool layers.
- Versatility: Perfect for picnics, potlucks, or a cozy night in.
Whether you’re looking to impress guests or satisfy your sweet tooth, this recipe is your go-to for a hassle-free dessert that still feels indulgent.
Ingredients and Equipment
Ingredients Needed
To create the perfect banana split cake, you’ll need just a handful of ingredients, most of which you probably already have in your pantry or fridge. Here’s a breakdown:
Crust
- 2 cups of graham cracker crumbs – The base for your crust, adding a delightful crunch.
- ½ cup of melted butter – To bind the crumbs together.
Filling
- 1 block (8 oz) of cream cheese, softened – This makes the filling creamy and rich.
- 1 cup of powdered sugar – Adds just the right amount of sweetness.
- 1 can (20 oz) of crushed pineapple, drained – Brings in that tangy, tropical flavor.
- 4 medium bananas, sliced – The star ingredient!
- 1 tub (8 oz) of whipped topping (like Cool Whip) – Lightens up the layers.
Toppings
- 1 jar of maraschino cherries – A classic touch of color and sweetness.
- Chocolate syrup or sprinkles – For the finishing drizzle.
- Optional: Chopped nuts like pecans or walnuts – Add crunch and nuttiness.
Optional Ingredient Variations
If you’re feeling adventurous, here are some creative tweaks:
- Substitute graham crackers with chocolate cookie crumbs for a richer crust.
- Swap pineapple with strawberry slices for a new flavor twist.
- Use gluten-free graham crackers to make it celiac-friendly.
Essential Tools and Equipment
Before you get started, gather these tools for a smooth process:
- Mixing bowls: One for the crust and one for the filling.
- Electric mixer: To whip up a smooth and fluffy filling.
- Springform pan or 9×13 baking dish: For assembling and serving.
- Spatula: To evenly spread each layer.
- Knife: To slice the bananas cleanly.
Pro Tip: Using a springform pan ensures neat layers and an easy release when serving. Need more guidance? Check out Perfecting Graham Cracker Crust for expert tips!
Step-by-Step Recipe Instructions
Preparing the Base
The foundation of this banana split cake is its buttery graham cracker crust. Here’s how to make it flawless:
- Combine the crumbs and butter: In a mixing bowl, stir together the graham cracker crumbs and melted butter until the texture resembles wet sand.
- Press into the pan: Transfer the mixture into your springform pan or baking dish. Use a flat-bottomed glass or spatula to press it down firmly, ensuring an even layer.
- Chill the crust: Pop the pan into the fridge for about 20 minutes to set while you prepare the filling.
Tip: For an even sturdier crust, freeze it for 10 minutes!
Layering the Filling
Now, let’s bring the creamy and fruity goodness to life.
- Whip up the cream cheese filling:
- In a bowl, use an electric mixer to beat the softened cream cheese until smooth.
- Gradually add powdered sugar and mix until fully combined and fluffy.
- Fold in half of the whipped topping to lighten the mixture.
- Layer the bananas:
- Slice bananas into even rounds and arrange them over the crust in a single layer. This creates a fruity base for the filling.
- Add the pineapple:
- Drain the crushed pineapple thoroughly (excess liquid can make your layers soggy).
- Spread the pineapple evenly over the bananas.
- Spread the cream cheese mixture:
- Gently spoon the cream cheese filling over the pineapple and smooth it out with a spatula.
Topping It Off
- Add the whipped topping: Spread the remaining whipped topping over the cream cheese layer.
- Decorate your cake: Drizzle chocolate syrup over the top, sprinkle chopped nuts (if using), and add maraschino cherries for a pop of color.
Refrigerate to Set
Allow your banana split cake to chill in the fridge for at least 4 hours or, even better, overnight. This helps the layers meld together and ensures a clean slice when serving.
Serving Suggestions and Storage
Best Ways to Serve
Presentation can elevate your dessert from great to unforgettable. Here’s how to make your banana split cake the star of the table:
- Slice cleanly: Use a sharp knife dipped in warm water to achieve neat slices. Wipe the knife between cuts for a polished look.
- Add extra toppings: Serve slices with a dollop of whipped cream or a drizzle of extra chocolate syrup.
- Pair it right: This dessert pairs beautifully with a hot cup of coffee or a tall glass of milk.
Fun Idea: Want individual portions? Assemble the cake in mason jars for a charming twist.
How to Store No-Bake Banana Split Cake
- Refrigeration:
- Cover the dish tightly with plastic wrap or aluminum foil.
- Store in the fridge for up to 3 days to keep it fresh and delicious.
- Freezing:
- Slice the cake and wrap each piece individually in plastic wrap.
- Place the wrapped slices in an airtight container and freeze for up to 2 months.
- Thaw overnight in the fridge before serving.
Benefits of No-Bake Desserts
Who doesn’t love a dessert that’s easy, quick, and doesn’t require firing up the oven? Let’s dive into why no-bake desserts like the banana split cake are so popular and why you should keep them in your recipe arsenal.
Convenience at Its Best
One of the biggest perks of a banana split cake is how effortless it is to prepare. Forget the stress of preheating ovens or waiting for layers to bake and cool. With just a little mixing and layering, you’ve got a dessert that’s ready to pop into the fridge. It’s a lifesaver for busy days or when you’re low on energy but still crave something sweet.
Perfect for Any Season
Summer heat making your kitchen unbearable? This no-bake recipe is the ultimate solution. The cool, creamy layers are refreshing and satisfying without adding to the heat. Even in colder months, it’s a delightful way to break the monotony of heavy, baked desserts.
Beginner-Friendly
Whether you’re new to the kitchen or just looking for a foolproof recipe, no-bake desserts are perfect. With no complex techniques or baking knowledge required, even kids can join in the fun. Layering bananas and spreading toppings? Easy peasy!
Versatile and Adaptable
From flavor swaps to portion sizes, no-bake recipes are incredibly flexible. Want to switch up the crust or add your favorite fruits? Go for it! They’re also great for making ahead, saving you time during busy events.
If you’re intrigued by the possibilities of no-bake desserts, check out this guide on Tips for Perfect No-Bake Desserts to ensure every treat turns out like a pro!
Healthier Options Are Easier
No-bake recipes often require fewer ingredients, and you can easily adapt them to be lighter or cater to specific diets. For instance, you can:
- Use low-fat cream cheese or sugar-free whipped topping.
- Swap graham crackers for gluten-free alternatives.
- Reduce the amount of sugar without compromising on taste.
Time-Saving Marvels
With a prep time of just 20–30 minutes, you’ll spend more time enjoying your dessert and less time in the kitchen. While the cake sets in the fridge, you’re free to focus on other tasks or simply relax.

Variations and Customizations
One of the best things about the banana split cake is its versatility. This dessert can be tailored to suit your preferences, dietary needs, or even the occasion. Let’s explore some exciting variations and customizations that will keep this recipe fresh and fun every time you make it.
Flavor Twists
Chocolate Lover’s Delight
- Swap the graham cracker crust with chocolate cookie crumbs for a rich and decadent base.
- Add a layer of chocolate ganache between the cream cheese filling and bananas for extra indulgence.
Tropical Paradise
- Use mango or kiwi slices in place of bananas.
- Incorporate coconut flakes into the whipped topping for a tropical vibe.
Berry Bliss
- Substitute crushed pineapple with fresh or frozen strawberries, raspberries, or blueberries.
- Drizzle strawberry sauce instead of chocolate syrup for a fruity twist.
Dietary Adaptations
Gluten-Free Option
- Use gluten-free graham crackers or cookies for the crust.
- Double-check all other ingredients to ensure they’re certified gluten-free.
Dairy-Free Version
- Replace cream cheese with a dairy-free alternative made from cashews or coconut.
- Use a plant-based whipped topping for the same creamy texture.
Low-Sugar Variation
- Use sugar-free pudding mix or whipped topping.
- Substitute powdered sugar with a low-calorie sweetener like stevia or monk fruit.
Creative Presentation Ideas
Individual Servings
- Assemble the dessert in small glass jars or cups for personal portions.
- Layer the ingredients just like the full cake, and top each jar with a cherry for a cute touch.
Layer Cake Style
- Instead of a single-layer dessert, repeat the layers of crust, filling, bananas, and toppings for a taller, more dramatic presentation.
Mini Bites
- Use a mini muffin tin to create bite-sized versions of the cake. Perfect for parties or casual snacking!
Festive Themes
Holiday Colors
- Add red and green sprinkles during Christmas or pastel-colored sprinkles for Easter.
- For Halloween, use orange and black toppings like candy pieces or colored drizzle.
Birthday Fun
- Top with colorful candles or edible glitter for a celebratory look.
Add Some Crunch
If you enjoy a bit of texture, consider mixing in:
- Crushed nuts like walnuts or pecans between the layers.
- Toffee bits or crushed pretzels sprinkled on top.
Frequently Asked Questions (FAQs)
Here’s a handy FAQ section to answer some common questions about making and enjoying banana split cake. Whether you’re troubleshooting or just curious, we’ve got you covered!
1. Can I make this dessert ahead of time?
Absolutely! This dessert is actually better when prepared ahead. The extra time allows the layers to set, making it easier to slice and serve. You can make it a day in advance and store it in the fridge, covered tightly with plastic wrap.
2. What fruits can I substitute for bananas?
While bananas are the classic choice, you can use fruits like strawberries, peaches, or even mangoes. Just make sure the fruits are fresh and not overly juicy to avoid a soggy cake.
3. How long does it take to set in the refrigerator?
For best results, refrigerate the cake for at least 4 hours. If you can leave it overnight, the flavors will meld beautifully, and the texture will be perfect.
4. Can I use a store-bought crust instead of making my own?
Yes! A pre-made graham cracker or cookie crust is a convenient option that works just as well. It’s a great time-saver if you’re in a hurry.
5. Is it possible to make a smaller version of this dessert?
Certainly. You can halve the recipe and assemble it in a smaller dish or even individual cups for single servings. This is a great option if you’re only serving a few people or want to avoid leftovers.
Conclusion
The no-bake banana split cake is more than just a dessert—it’s a crowd-pleaser, a time-saver, and a celebration of simple, delicious ingredients. From its buttery graham cracker crust to the creamy, fruity layers topped with cherries and chocolate, every bite feels like a treat straight out of your favorite ice cream parlor.
What makes this dessert truly special is its versatility. Whether you stick to the classic recipe or customize it with your own twists, it’s guaranteed to be a hit at any gathering. And let’s not forget the convenience of a no-bake recipe that saves you time and effort while delivering maximum flavor.
So, grab your ingredients, assemble those layers, and let your refrigerator do the rest. In just a few hours, you’ll have a stunning and scrumptious cake that’s sure to wow your family, friends, and most importantly, your taste buds.
No-Bake Banana Split Cake
Ingredients
- Crust:
- 1 cup graham cracker crumbs
- 1/4 cup chopped pecans
- 1/4 cup melted butter
- Filling:
- 1 8 oz package cream cheese, softened
- 1 cup powdered sugar
- 1 teaspoon vanilla extract
- 1 8 oz container whipped topping, thawed
- 1 banana sliced
- 1 cup sliced strawberries
- 1 cup pineapple chunks drained
- Topping:
- 1 cup whipped topping thawed
- 1/4 cup chopped pecans
- 1/4 cup maraschino cherries
- Chocolate syrup
Instructions
- Make the Crust:
- In a medium bowl, combine graham cracker crumbs, pecans, and melted butter.
- Press the mixture into a 9×13 inch baking dish.
- Set aside.
- Make the Filling:
- In a large bowl, beat cream cheese until smooth.
- Gradually beat in powdered sugar and vanilla extract until combined.
- Gently fold in whipped topping.
- Spread half of the cream cheese mixture over the crust.
- Layer banana slices, strawberries, and pineapple chunks over the cream cheese.
- Spread the remaining cream cheese mixture over the fruit.
- Assemble and Chill:
- Top with whipped topping, pecans, and maraschino cherries.
- Drizzle with chocolate syrup.
- Cover and refrigerate for at least 2 hours, or up to overnight.