
Cheese-stuffed pretzels? Oh, heck yes! If you’ve ever bitten into a soft, golden-brown pretzel only to be greeted by a gooey, melty center, you know exactly why these are downright irresistible. They bring the best of both worlds—the chewy, salty goodness of a classic pretzel and the creamy, stretchy delight of melted cheese. Whether you’re whipping up a batch for an afternoon snack, a party, or a cozy weekend treat, this guide will walk you through everything you need to know about making these beauties at home.
From choosing the perfect cheese filling to nailing that signature pretzel shape, we’ll cover every detail, including storage tips, tasty variations, and the best dips to serve them with. So, if you’re ready to sink your teeth into the ultimate cheesy delight, let’s get rolling!
Part 1: Introduction
What Are Cheese-Stuffed Pretzels?
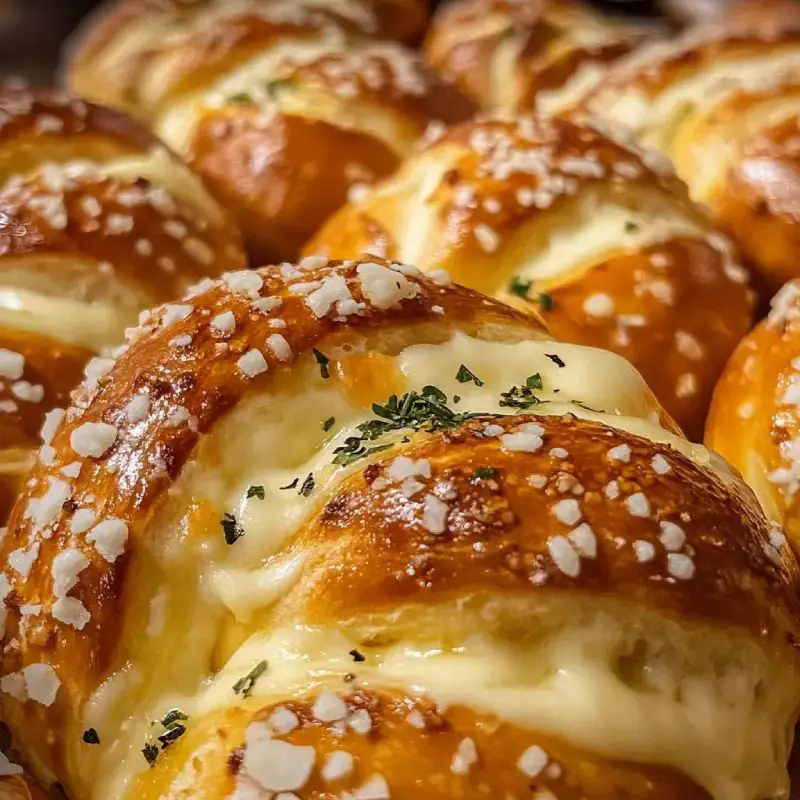
Imagine this: A freshly baked, golden pretzel, its surface perfectly crisp, dotted with coarse salt, and its inside packed with warm, oozy cheese. Sounds heavenly, right? That’s exactly what you get with cheese-stuffed pretzels—a delicious twist on the beloved classic. These little flavor bombs aren’t just mall food anymore. Sure, you’ve probably grabbed one from a food stand, but making them at home? That’s next-level satisfying. You control the ingredients, experiment with different cheeses, and skip all the artificial stuff. Plus, your kitchen will smell amazing!
Why Cheese-Stuffed Pretzels Are a Must-Try
If you’re still on the fence about making these, let’s break down why you need them in your life:
Soft & chewy with a gooey surprise – Each bite gives you that classic pretzel chewiness with an unexpected cheese pull.
Customizable to your taste – Love pepper jack? Prefer mozzarella? Want a combo of cheddar and cream cheese? You got it!
Perfect for any occasion – Game day? Check. Snack time? Yep. Party appetizer? Absolutely.
Easier than you think – If you’ve never made pretzels, don’t sweat it. The process is simple, and I’ll walk you through every step.
A Quick Look at How They’re Made
Here’s a sneak peek at what you’ll be doing:
Mix & knead the dough until it’s soft and stretchy.
Let it rise so it gets nice and fluffy.
Shape & stuff each pretzel with your favorite cheese.
Dip in a baking soda bath for that signature pretzel crust.
Bake until golden, then devour!
Each step matters, and skipping one could mean losing that iconic pretzel texture. But don’t worry—I’ve got all the tips to make sure you get it just right.
What’s Coming Next?
Now that we’ve set the stage, it’s time to get into the nitty-gritty details. Up next, we’ll talk about the essential ingredients and how to swap them for different dietary needs. Spoiler alert: You probably have most of them in your kitchen already! So, grab your mixing bowl—we’re about to turn your kitchen into a pretzel paradise!
Understanding the Basics
What Are Cheese-Stuffed Pretzels Made Of?
Before you start rolling out dough and stuffing it with gooey cheese, it’s important to understand the key ingredients that make these pretzels so special. The right combination of ingredients ensures that perfect balance of a chewy, golden-brown crust with a rich, melty center. The good news? You probably have most of these in your kitchen already.
Essential Ingredients for Soft and Chewy Pretzels
Flour – All-purpose flour works best for a classic soft pretzel texture. If you want a slightly chewier bite, try using bread flour, which has a higher protein content.
Yeast – Active dry yeast is the magic behind the dough’s rise. It gives pretzels their airy, chewy structure. If using instant yeast, you can skip the activation step and mix it straight into the flour.
Warm Water – The ideal temperature for yeast activation is between 105°F and 110°F. Too hot, and you’ll kill the yeast; too cold, and it won’t activate properly.
Sugar – Just a small amount helps feed the yeast, allowing the dough to rise properly. Granulated sugar works best, but you can substitute honey or brown sugar for a slightly different flavor.
Salt – You’ll need two types of salt—fine salt for the dough and coarse salt for topping. The dough’s salt enhances flavor, while the coarse salt gives that signature salty crunch on the outside.
Cheese – The star of the show. Cheddar is the most common choice, but mozzarella, pepper jack, Swiss, or even a mix of different cheeses can take your pretzels to the next level. The key is choosing a cheese that melts well without releasing too much moisture.
Baking Soda – This is what gives pretzels their signature deep brown color and slightly crisp exterior. The dough is dipped in a baking soda and warm water bath before baking, which helps create that classic pretzel crust.
Egg Wash – Brushing the pretzels with beaten egg before baking gives them a glossy finish and enhances their golden color.
Choosing the Best Cheese for Stuffing
The right cheese makes all the difference. You want something that melts beautifully but doesn’t make the dough soggy. Here are some top choices:
Cheddar – Bold, tangy, and melts perfectly. Sharp cheddar adds a more intense flavor, while mild cheddar offers a creamier texture.
Mozzarella – Ideal for that stretchy, melty cheese pull. Best combined with a more flavorful cheese.
Pepper Jack – For those who love a little heat. The subtle kick of spice pairs well with the buttery pretzel dough.
Swiss – A milder, nutty option that melts well but doesn’t overpower the pretzel flavor.
Cream Cheese – Perfect for a smooth, creamy center. Try mixing it with shredded cheddar for a rich, velvety filling.
Ingredient Swaps for Dietary Needs
Want to make your pretzels a little healthier or fit certain dietary needs? Here are some easy substitutions:
Gluten-Free Option – Swap all-purpose flour for a 1:1 gluten-free flour blend. Keep in mind that gluten-free dough won’t be as stretchy, so handle it carefully.
Dairy-Free Option – Use plant-based butter and a dairy-free cheese alternative like cashew cheese or almond-based mozzarella.
Low-Carb Option – Pretzel dough is naturally high in carbs, but you can try a mix of almond flour and coconut flour for a lower-carb version. The texture will be a bit different, but it still works!
Why the Baking Soda Bath is Essential
Ever wondered why pretzels have that deep brown color and slightly crisp exterior? The secret is a quick dip in a baking soda bath before baking. When the pretzels are boiled in water with baking soda, it changes the dough’s pH level, creating the perfect crust when baked. Without this step, your pretzels will look more like soft bread rolls than true pretzels.
For the best results, mix 2 tablespoons of baking soda with 2 cups of warm water, then quickly dip each pretzel before placing it on the baking sheet. This step may seem small, but it makes all the difference in achieving that authentic pretzel look and taste.
Step-by-Step Recipe Instructions
How to Make Cheese-Stuffed Pretzels at Home
Now that you know what goes into making these irresistible cheese-stuffed pretzels, it’s time to roll up your sleeves and start baking. While the process may seem a bit intimidating at first, it’s actually quite simple. Follow these steps, and you’ll be pulling apart warm, gooey, golden-brown pretzels in no time.
Step 1: Activate the Yeast for a Fluffy Dough
Yeast is what gives the pretzel dough its soft and chewy texture, so activating it properly is crucial.
In a mixing bowl, combine 1 ½ cups of warm water (between 105°F and 110°F), 1 tablespoon of sugar, and 2 ¼ teaspoons of active dry yeast. Give it a gentle stir and let it sit for about 5 minutes. When the mixture turns frothy and bubbly, your yeast is ready to go. If there’s no foam, your yeast may be expired, or the water temperature wasn’t right.
Step 2: Mix and Knead the Dough
Add 4 cups of all-purpose flour and 1 teaspoon of salt to the yeast mixture. Stir until a rough dough forms.
Transfer the dough to a lightly floured surface and knead for about 5-7 minutes until it becomes smooth and elastic. If the dough feels too sticky, add a tablespoon of flour at a time until it’s easy to handle. If it’s too dry, sprinkle a bit of warm water.
Place the kneaded dough in a greased bowl, cover it with a clean towel, and let it rise in a warm spot for about 1 hour or until doubled in size.
Step 3: Preheat the Oven and Prepare Your Workstation
Preheat your oven to 425°F (220°C).
Line a baking sheet with parchment paper and lightly grease it to prevent sticking.
In a small bowl, beat 1 egg for an egg wash, which will give the pretzels a glossy finish.
Step 4: Divide and Shape the Dough
Punch down the risen dough and divide it into 8 equal portions.
Roll each piece into a 20-inch rope. Make sure the ropes are evenly thick so they bake evenly.
Using a rolling pin, flatten each rope into a long, wide strip about 2 inches wide—this will make stuffing the cheese much easier.
Step 5: Stuff with Cheese Without Any Mess
Spread a small amount of softened cream cheese along the center of each flattened dough strip.
Sprinkle about 2 tablespoons of shredded cheddar cheese (or your preferred cheese) over the cream cheese.
Carefully fold the dough over the cheese, pinching the edges to seal it tightly. Make sure there are no gaps, or the cheese might leak out while baking.
Step 6: Shape into Pretzels
Take each cheese-filled dough strip and carefully twist it into the classic pretzel shape. To do this, form a “U” shape, cross the ends over each other, and press them down onto the bottom of the U.
If shaping pretzels feels tricky, you can also make pretzel bites by cutting the stuffed dough into 2-inch pieces instead.
Step 7: The Secret to the Perfect Pretzel Crust – The Baking Soda Bath
This step gives pretzels their iconic golden color and chewy texture.
In a bowl, mix 2 tablespoons of baking soda with 2 cups of warm water.
Brush the pretzels with this mixture before baking. This helps create the classic deep brown crust while keeping the inside soft.
Sprinkle the tops with coarse salt for that perfect salty crunch.
Step 8: Bake to Golden Perfection
Place the pretzels on the lined baking sheet and bake for 12-15 minutes, or until golden brown.
Once they’re out of the oven, immediately brush them with melted butter for an extra boost of flavor.
Step 9: Enjoy the Gooey Goodness
Let them cool for about 5 minutes before serving. The cheese inside will still be molten, so be careful!
Serve with your favorite dips like homemade cheese sauce, honey mustard, or ranch dressing.
Pro Tips for Perfect Pretzels

Now that you’ve got the recipe down, it’s time to fine-tune your technique. Even the best bakers run into issues when making cheese-stuffed pretzels, whether it’s cheese leaking out, pretzels turning too dense, or the crust not getting that deep golden brown. No worries—I’ve got all the tips and tricks you need to make sure your pretzels come out flawless every time.
How to Prevent Cheese from Leaking Out
One of the biggest challenges when making stuffed pretzels is keeping the cheese inside where it belongs. Nothing’s worse than watching your perfectly stuffed pretzel leak all its delicious filling onto the baking sheet. Here’s how to avoid that:
Seal the dough properly – When folding the dough over the cheese, make sure to pinch the edges tightly. If there are any gaps, the cheese will escape while baking.
Double-seal for extra protection – After pinching the dough shut, press it down gently and roll the seam on the counter to reinforce the seal.
Don’t overfill – As tempting as it is to pack in as much cheese as possible, too much filling will push through the dough and leak out. Stick to about 2 tablespoons of cheese per pretzel.
Chill the filled dough before shaping – If your dough feels too soft or sticky after filling, refrigerate it for 5-10 minutes before shaping. This helps firm up the cheese and makes sealing easier.
Bake at the right temperature – Too high, and the cheese will bubble out before the pretzel finishes baking. Too low, and the dough won’t crisp up properly. 425°F (220°C) is the sweet spot.
The Secret to a Soft Yet Chewy Texture
Soft pretzels should be chewy on the outside but tender inside. If your pretzels turn out too dense or tough, here’s what might be going wrong:
Use warm water at the right temperature – Yeast works best in water that’s between 105°F and 110°F. If it’s too hot, it will kill the yeast, preventing the dough from rising properly.
Knead the dough enough—but not too much – Aim for about 5-7 minutes of kneading until the dough is smooth and elastic. Over-kneading can make pretzels tough, while under-kneading leads to a dense texture.
Let the dough rise in a warm place – If your kitchen is chilly, place the dough in a slightly warm oven (turn it on for a minute, then turn it off) to help it rise properly.
Avoid adding too much flour – A common mistake is adding too much flour while kneading. If the dough feels sticky, add just a light dusting of flour at a time rather than dumping in a lot at once.
Getting That Perfect Deep Brown Crust
A soft pretzel just isn’t the same without its signature deep golden brown crust. If your pretzels are coming out too pale or dry, here’s what you need to do:
Don’t skip the baking soda bath – This is what gives pretzels their classic crust. If you don’t dip them in a baking soda solution, they’ll look more like soft bread rolls.
Use the right baking soda-to-water ratio – For every 2 cups of warm water, use 2 tablespoons of baking soda. Too much, and your pretzels might taste bitter; too little, and they won’t brown properly.
Brush the baking soda solution evenly – Instead of dipping the pretzels, try brushing them with the solution. This prevents the dough from getting too wet, which can affect texture.
Egg wash for extra shine – If you want that glossy finish, brush the pretzels with a beaten egg before baking. This enhances the golden color and gives the crust a slight sheen. Bake on the middle rack – Placing the pretzels too high or too low in the oven can cause uneven browning. The middle rack ensures even heat distribution.
Common Mistakes to Avoid
Even seasoned bakers make mistakes, but knowing what to watch out for will save you a lot of frustration.
Skipping the dough rise – If you rush the rise time, your pretzels will be too dense. Always let the dough double in size before shaping.
Not preheating the oven – If your oven isn’t fully heated before the pretzels go in, they won’t bake evenly.
Using cold cheese – Cold cheese won’t melt as well and may create uneven pockets inside the pretzel. Let it come to room temperature before stuffing.
Adding too much salt – Coarse salt is great, but a heavy hand can make pretzels too salty. A light sprinkle is all you need.
Not eating them fresh – Soft pretzels are best enjoyed right out of the oven. If you need to store them, warm them up before serving for the best texture.
Variations & Customizations
Once you’ve mastered the classic cheese-stuffed pretzel, it’s time to get creative. The beauty of homemade pretzels is that you can tweak them to match your cravings. Want a little heat? Add jalapeños. Prefer something garlicky? Butter and herbs will do the trick. In this section, we’ll explore some mouthwatering variations and different ways to shape and serve your pretzels.
Creative Cheese-Stuffed Pretzel Variations
Spicy Jalapeño Cheese Pretzels
If you love a little kick, this version is for you. The combination of melted cheddar and spicy jalapeños creates a bold flavor that pairs perfectly with the chewy pretzel dough.
How to make it: Before sealing the dough, sprinkle thinly sliced fresh jalapeños over the cheese. If you prefer a milder heat, remove the seeds first.
Extra tip: A pinch of smoked paprika in the dough adds a subtle, smoky flavor.
Garlic Butter Parmesan Pretzels
For a more savory, rich pretzel, garlic butter and Parmesan are an unbeatable combo. This version is especially good for dipping in marinara sauce.
How to make it: After baking, brush the pretzels with melted garlic butter and sprinkle with grated Parmesan and a little dried oregano.
Extra tip: Add roasted garlic to the cheese filling for an even deeper flavor.
Sweet & Savory Cinnamon Cream Cheese Pretzels
If you’re in the mood for something sweet, this dessert-style pretzel is a game-changer. The combination of warm cinnamon and sweetened cream cheese makes for an indulgent treat.
How to make it: Swap cheddar for sweetened cream cheese and sprinkle cinnamon sugar over the top before baking.
Extra tip: Serve with a side of vanilla glaze for dipping.
Buffalo Cheddar Pretzels
If you’re a fan of buffalo-flavored anything, these pretzels are calling your name. A spicy, tangy bite combined with melted cheddar creates the ultimate game-day snack.
How to make it: Before sealing, mix shredded cheddar cheese with a teaspoon of buffalo sauce. After baking, brush with a little extra sauce for added heat.
Extra tip: Dip in cool ranch dressing to balance out the spice.
Different Shaping Techniques for Pretzels
Maybe the classic pretzel shape isn’t your thing, or you’re looking for a quicker, easier way to prepare your dough. No problem—there are plenty of ways to shape and serve cheese-stuffed pretzels.
1. Pretzel Bites (Easiest Method)
Instead of twisting each piece into a pretzel shape, simply roll the dough into a long rope, stuff it with cheese, and cut it into 2-inch pieces. Bake as usual, and you’ve got bite-sized, poppable cheese-stuffed pretzel bites!
Best for: Snacking, party platters, and kids’ lunches.
Dipping ideas: Cheese sauce, honey mustard, or ranch.
2. Pretzel Knots
A simple and elegant twist on traditional pretzels, knots are easy to shape and hold in the cheese filling well.
How to shape: After stuffing the dough with cheese, tie it into a loose knot rather than forming a classic pretzel shape. Bake until golden brown.
Best for: Fancy appetizers or bread basket alternatives.
3. Pretzel Rolls
For a sandwich-ready version, roll your stuffed dough into small, round rolls rather than pretzels. These are perfect for slicing open and using as cheesy pretzel buns for sliders or mini sandwiches.
Best for: Sliders, mini burgers, or even breakfast sandwiches.
Frequently Asked Questions About Cheese-Stuffed Pretzels
Even with a solid recipe, you might have a few lingering questions about cheese-stuffed pretzels. From preventing leaks to making them ahead of time, here are the answers to some of the most commonly asked questions.
How Do You Keep Cheese from Leaking Out of Pretzels?
The key to preventing leaks is sealing the dough properly. Make sure to pinch the edges tightly after stuffing the cheese inside. You can also roll the seam on the counter to reinforce the closure. Chilling the stuffed dough for 5-10 minutes before shaping also helps keep everything intact.
Can I Make Pretzel Dough Ahead of Time?
Yes, you can prepare the dough in advance. After kneading, store it in an airtight container in the refrigerator for up to 24 hours. When ready to use, let it come to room temperature for about 30 minutes before shaping and baking.
Why Do Pretzels Need a Baking Soda Bath?
The baking soda bath is what gives pretzels their signature chewy texture and deep brown color. When the dough is briefly dipped in a baking soda solution, it changes the pH level, helping the surface develop a rich, golden crust when baked. Skipping this step will result in a texture more like regular bread rather than a true pretzel.
Can I Use Different Cheeses?
Absolutely! While cheddar is the most popular choice, you can experiment with mozzarella, pepper jack, Swiss, or even a mix of cheeses. Just make sure to use cheeses that melt well and don’t release too much moisture.
What’s the Best Way to Freeze Cheese-Stuffed Pretzels?
To freeze, let the pretzels cool completely, then wrap each one tightly in plastic wrap. Place them in a freezer-safe bag and store for up to three months. When ready to eat, reheat them in a 350°F oven for 10-12 minutes until warmed through. Avoid microwaving, as it can make them soggy.
How Do I Make Pretzels Without Yeast?
If you don’t have yeast, you can make a quick pretzel dough using baking powder instead. The texture won’t be as chewy, but it will still be delicious. Simply substitute the yeast with 2 teaspoons of baking powder and skip the rising time.
Final Thoughts on Making the Best Cheese-Stuffed Pretzels
By now, you’ve got everything you need to create the perfect batch of cheese-stuffed pretzels. Whether you stick to the classic version or try a bold variation, the key to success is following each step carefully—from properly sealing the dough to using the right baking soda bath technique.
These pretzels are best enjoyed fresh, straight out of the oven, when the cheese is still warm and gooey. But if you need to store or reheat them, a quick trip to the oven will bring them back to life.

Cheese-Stuffed Pretzels
Ingredients
- – 1 ½ cups warm water
- – 1 tablespoon sugar
- – 2 ¼ teaspoons active dry yeast
- – 4 cups all-purpose flour
- – 1 teaspoon salt
- – 4 ounces cream cheese softened
- – 1 cup shredded cheddar cheese
- – 1 egg beaten
- – Coarse salt for topping
- – 2 tablespoons baking soda
- – 2 cups warm water
Instructions
- In a bowl, combine warm water, sugar, and yeast. Let it sit for about 5 minutes until frothy.
- Add flour and salt to the yeast mixture, and knead until a smooth dough forms. Cover and let it rise in a warm place for about an hour.
- Preheat the oven to 425°F (220°C) and line a baking sheet with parchment paper.
- Divide the dough into 8 equal portions. Roll each portion into a long rope, about 20 inches in length.
- Flatten each rope and spread cream cheese down the center, then sprinkle cheddar cheese on top. Fold the dough over the cheese and seal the edges.
- Shape each filled rope into a pretzel and place on the prepared baking sheet.
- In a small bowl, mix baking soda with warm water. Brush the pretzels with the mixture and sprinkle coarse salt on top.
- Bake the pretzels for 12-15 minutes or until golden brown.
- Remove from the oven and brush with beaten egg for a shiny finish.
- Serve warm and enjoy the gooey cheese-filled goodness of the pretzels.